
Wednesday, May 15, 2013
If in doubt, prime
Studio Plank

- Older pallets will have wood with the most character but will also be hardest to break down. I used a reciprocating saw and highly recommend that method.
- The downside of using the reciprocating saw is you end up with nail heads in all your boards. You'll need to tap those out if you're going to run the wood through a jointer or planer. If not, just leave them in. They'll enhance the rustic look of the finish product and save you a LOT of time.
- We used a water based stain. That makes for easy clean up but you get a flatter finish than you would with oil based stain. We compensated by thinning the stain out to various degrees. Between different concentrations of stain and the different absorbency of each board we got the mottled look shown in the photo.
- If you're not going to mill the boards, you will have small gaps between them. We used plywood instead of sheetrock and stained it a dark brown. This makes the gaps unnoticeable unless you're on a ladder and looking right at them.
- We sorted the boards into piles of similar width and used these to make rows. Our contractor used a table saw to rip the boards in each row to identical width. So, each row is a different width but the boards within it are the same width. This made for relatively easy installation while still preserving a mottled, rustic look.


Order of Operations

Oh and one other note, use oil based stain or, if you live in the People's Republic of California, stain with the highest oil content you can find. It will go on MUCH easier. Lowes has a better selection of 'high oil' stains than Home Depot.

Tuesday, May 14, 2013
Changing Table

My original plan was to strip the original finish, apply new paint and then antique it by sanding the edges and applying a thin layer of dark stain. I did all this on a door from a hutch not used in the conversion and am glad I used the test piece. It turned out the original finish was so strong that the stain would dye the paint but wouldn't do anything to the wood I exposed in the sanding step. I ended up forgoing the antiquing step but may revisit that with dark wood wax in the future.


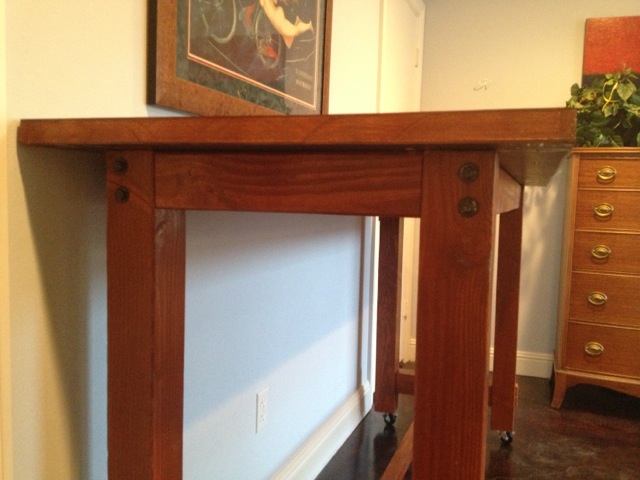
The Man's Desk
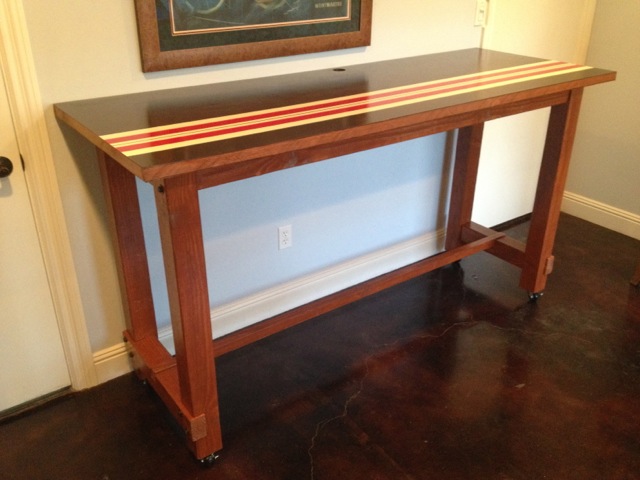
The end result turned out pretty well. The desk is serving its function well and I've received lots of compliments on it. Getting it built was a real bear and I learned several lessons along the way. In no particular order:
- A 7" circular saw is a very versatile tool but has its limits. Cutting through 4x4s requires a pass on either side and no matter how careful you are they will be slightly off. I tried leveling the cut ends with a belt sander, some files and 'touch ups' with the circular saw. That all helped a little but in the end the weight of the door is what keeps the whole thing level. Next time, I'll find access to a table saw or use two 2x4s attached to one another as an L.
- Dimensional lumber is never perfectly straight. Sometimes that's not a big problem but a small warp or curve is magnified when making something six feet long. This problem is compounded when working with tools like the circular saw. Guides and fences can help but have their limitations. 'Stationary' tools like a table saw are better; correcting your stock with a jointer and planer is best.
- Water based stain is great for clean up but produces a much 'flatter' look that you'll get with oil based stain.
- Priming is not a step worth skipping. I originally planned to strip the paint off the old door and stain it. The chemical stripper took the top coat of paint off easily but barely touched the primer underneath. I could have belt sanded the primer off but figured it would be easier to just repaint. Fine idea but I should have put fresh primer down first. I used latex paint and it didn't have the best grip with the old primer. That made for a lot of extra touch-up work.
- A dry fit will help you catch big/obvious problems but be prepared for some additional changes when you do set the screws and bolts. Remember the aforementioned issues with dimensional lumber and imprecise cutting tools? They all add up and when things are pulled into final shape some dimensions will change. In my case the footrest was measured to overhang the cross pieces by 1/4". After tightening the bolts my overhang disappeared. In hindsight, I should have cut it a little longer and planned to trim it to final size after assembly.
- I had a weird issue with the brown paint. Each time I touched-up a spot, it dried a slightly different shade. The best solution I found was to 'blend' it by sanding it and the surrounding area with 220 grit sandpaper. When the sanded area was covered with Varathane it matched its surroundings well enough to be unnoticeable.
Here's some more pics of the finished product:


Subscribe to:
Posts (Atom)