A DIY blog for the rest of us. So you saw a neat photo on Pinterest or were inspired by a show on HGTV. Can you really do it yourself? Maybe, but it's going to be tougher than it looks. This blog is a journal of my DIY projects: the good, the bad and the ugly. Hopefully you can avoid some of my mistakes and frustration.

Monday, July 15, 2013

Flower Power


The previous owner left a concrete base in our backyard. It's hollow in the middle but I figured it would make a decent side table if a top was added. I planned on cutting and staining a simple disk but then got inspired to try something more ornate. I used different colors of outdoor stain and then put a couple layers of weather sealant on to protect the unstained areas.

A good learning experience

The cladding project I began several weeks ago is finally finished. Most of the cladding was glued on with construction adhesive, brads were added to several of the side pieces and screws were countersunk into the front pieces. Some of this proved tricky as the 'carcass' I was cladding was made of old fiberboard. It was dried out, which didn't leave much grip for nails or screws, and had water damage in a few areas (leaving uneven surfaces). I came up with a bunch of creative workarounds and am glad this one is finished.


Liftoff!

I really should have followed my intuition and stopped and shifted gears with this project when the brown paint proved difficult to strip. I got a layer of stain on, only to be disappointed with the results. The wood didn't turn out to be very interesting (in terms of grain patterns) and proved difficult to work with. The result was a blotchy mess:


I thought about doing the antique patina look I previously considered but then decided to try something more whimsical. The dimensions of this shelf reminded me of something I saw over on Ana White's site and I decided to give that a try.


With the shelf unit already built, I used some plywood scraps to make the rocket fins and nosecone. The latter was made from 3-ply material and getting  good 45 degree edges was a little tricky. I thought it would be simpler to build it with flush edges but in hindsight something with overhang as shown in the plans is probably the way to go.

Saturday, June 8, 2013

Preview of the next project

The (for now) final storage project for my son's room involves yet another old shelf from the garage. This thing is a real piece of junk. It's made of MDF, has really ugly veneers and trim pieces and the previous owner started priming it and then abandoned the project.

I thought about priming and painting the whole thing but figured that would only marginally improve things. I could get a better color but I'd still have a lot of poor surfaces and think it would look like a slapped a coat of paint on a piece of junk. Instead I found some inspiration from a project over at Instructables.

I'll be cladding the sides and front of my unit in pallet wood, repainting the inside and adding a stained wood top. The first step was to run some pallet wood through the jointer and cut to length. In this case I'll probably be gluing the jointed edge to the shelf and allowing the uneven surfaces to create some texture (opposite of what I did with the smaller shelf unit). The next step is to clean up all these boards with the jointer or a sander and decide which ones get painted and which stained.


Another restoration

I found another old shelf that could be upcycled for storage in our son's room. I'm trying to add more 'in process' photos to these posts so here goes.

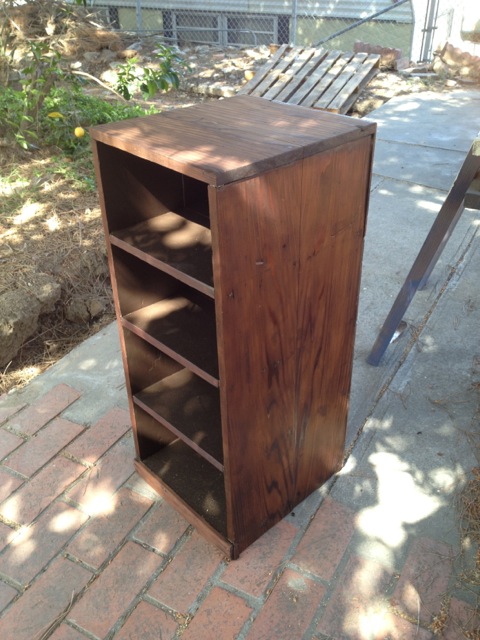
The shelf was covered in a dull brown paint and was in pretty beat-up condition. As I was cleaning it up, I noticed raised nails and some weird kind of staples. The former were easy enough to pound in but the latter required a lot of careful filing. There's a lot of ways to join wood, I recommend choosing anything other than protruding metal.


I started stripping with a random orbit sander and then switched to the belt sander as the brown paint was very thick and strong. The shelf unit wasn't assembled very well and there were a lot of uneven surfaces and protruding points. It broke a belt on the belt sander and started shredding a disk on the random orbit sander. Nice. What I should have done was primed over the brown paint, added a top coat of white, spot sanded and stained the whole thing. That would have given me an antiqued look with a nice patina of brown, stained white and stained bare wood.

Alas, I was committed and decided to bring out the heavy artillery. Chemical stripper is great for uneven surfaces but is a real mess to work with. The stripper took off 90% of the brown paint, leaving a couple standing blotches and a brown color to the wood. Spot sanding took care of both of these issues.

After all the difficulty with the outer surfaces, I figured there was no way I was going to get the brown paint off the inside. I did a quick sanding to rough things up, put on a layer of primer and finished with a new coat of brown paint. The outside was stained and is drying overnight. Tomorrow, I'll decide if it needs a second coat and start with the polyurethane.

A 'quick' restoration

Well, as quick as anything is around here these days. Our newborn son has arrived and his room is a little short on storage. This table was left on our patio by the previous owner. The bottom shelf was decomposing MDF and the top was a couple of paving squares. I know, weird. I stripped everything down and repainted the frame. The old shelves were tossed out and replaced with pallet wood. 

For the new shelves, I used a couple new toys in my shop. The boards were run through a jointer and then ripped and cut to length on a bandsaw. I went back to the jointer to clean up the ripped edges. This gave me a relatively flat surface and enough straight edges for a glue-up. I belt sanded the 'flat' side to even things out and then applied stain and polyurethane. The bottom is unfinished and extremely uneven but that doesn't matter in this case. To get both sides flat I'd need a thickness planer but that's a toy for another day.


Wednesday, May 15, 2013

If in doubt, prime

My wife painted the doors on her studio. The manufacturer told us they were painted "primer white." Well that must be a color as it sure as heck wasn't primer. When in doubt, use primer. Even if you don't need it for adhesion purposes, it can reduce the number of color coats you'll need. Better to spend a little more time up front than having to redo the whole project.